
This article explains how we recently configured a D365 FSCM v10.0.43 VHD as a Commerce development environment. We used the excellent LinkedIn post, PowerShell script and video by Valery Plotnik as a starting point.
- Background
- First steps
- Get ready to install the Commerce Scale Unit (CSU) and Store Point of Sale (POS)
- Install the Commerce Scale Unit (CSU) and Store Point of Sale (POS)
- Initialise the Store Point of Sale
- Initialise the Commerce Point of Sale
- Host Product Images for POS
- eCommerce Development
- Development Extension concepts
- Trouble shooting
Background
There are many components to install and configure to develop extensions for Dynamics 365 Commerce, and these of course depend on the type of customisation that is required.
The Commerce Scale Unit is a cross-solution component, and there are three options for developing with it:
- Local self-hosted CSU
- Local IIS-hosted CSU
- Virtual machine development
The first part of this guide focuses on Virtual machine Headless and Store Commerce development, and the second part will focus on E-commerce development.
The final part of the guide will introduce the various extension concepts and how to get started with each.
First steps
- Download the VHD from the Shared Asset Library in LCS and get it running under HyperV.
- Generate a self-signed certificate (shortcut on desktop) and run the Admin User provisioning tool (from C:\AOSService\PackagesLocalDirectory\bin\AdminUserProvisioning.exe).
- Edit C:\AOSService\webroot\web.config and set a value for LCS.EnvironmentId (If you don’t do this, you will see the error Property LCS.LCSEnvironmentId is empty string from object instance ApplicationEnvironment later on.)
<add key="LCS.EnvironmentId" value="DummyValue" />- Browse to https://usnconeboxax1aos.cloud.onebox.dynamics.com/ and set your default company to USRT and change the worker associated with your admin user to “Alexander Eggerer”
Get ready to install the Commerce Scale Unit (CSU) and Store Point of Sale (POS)
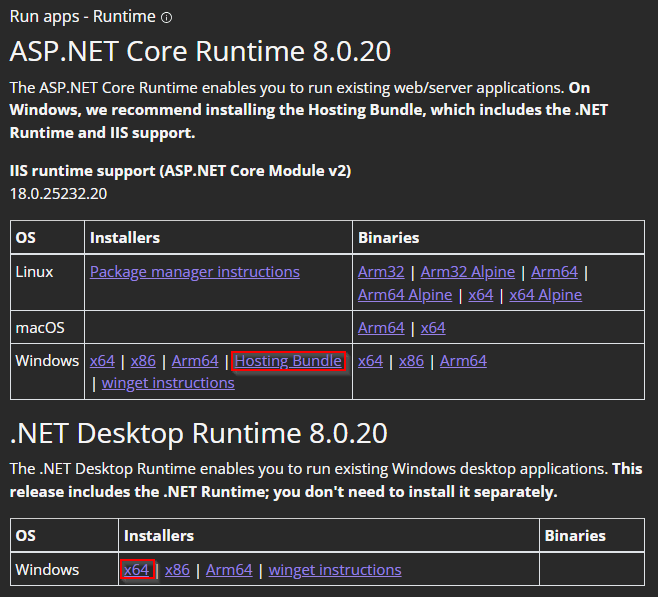
- Download and install the ASP.NET Core Runtime Windows Hosting Bundle and the x64 .NET Desktop Runtime
- Launch Windows PowerShell as Admin
- Install the Microsoft Graph modules
Install-Module Microsoft.Graph.Authentication
Install-Module Microsoft.Graph.Applications- Add the following registry settings to support the hardware station (which still uses v2 of the .NetFramework)
New-ItemProperty -Path "HKLM:SOFTWARE\Microsoft\.NETFramework\v2.0.50727" -Name "SystemDefaultTlsVersions" -Value "0000001" -PropertyType "dword"
New-ItemProperty -Path "HKLM:SOFTWARE\Microsoft\.NETFramework\v2.0.50727" -Name "SchUseStrongCrypto" -Value "0000001" -PropertyType "dword"
New-ItemProperty -Path "HKLM:SOFTWARE\Wow6432Node\Microsoft\.NETFramework\v2.0.50727" -Name "SystemDefaultTlsVersions" -Value "0000001" -PropertyType "dword"
New-ItemProperty -Path "HKLM:SOFTWARE\Wow6432Node\Microsoft\.NETFramework\v2.0.50727" -Name "SchUseStrongCrypto" -Value "0000001" -PropertyType "dword"- Download the excellent PowerShell script mentioned in Valerie’s blog and put it in C:\Temp
- Download these files from the Retail Self-service package files folder in the LCS Shared Asset Library and put them in C:\Temp:
- 10.0.43 – Hardware Station (SEALED) (Version 14)
- 10.0.43 – Store Commerce (Version 37)
- 10.0.43 – Commerce Peripheral Simulator (Version 14)
- 10.0.43 – Commerce Scale Unit (SEALED) (Version 37)
- Download and install MCS: OPOS Common Control Objects – Current Version
- Reboot the server!
Install the Commerce Scale Unit (CSU) and Store Point of Sale (POS)
From Windows PowerShell, change to the C:\Temp folder and run Valery’s PowerShell script (see the YouTube video for further details):
cd C:\Temp
.\Commerce_CreateCertAndAppReg.ps1
Follow the instructions, paying attention to the following steps in particular:
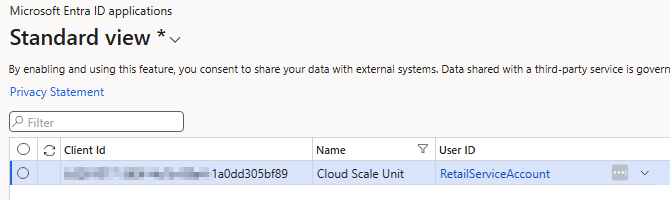
Step 1 – Create Entra ID Application registration
This uses the Client Id of the app-d365-csu app registration for the CSU.
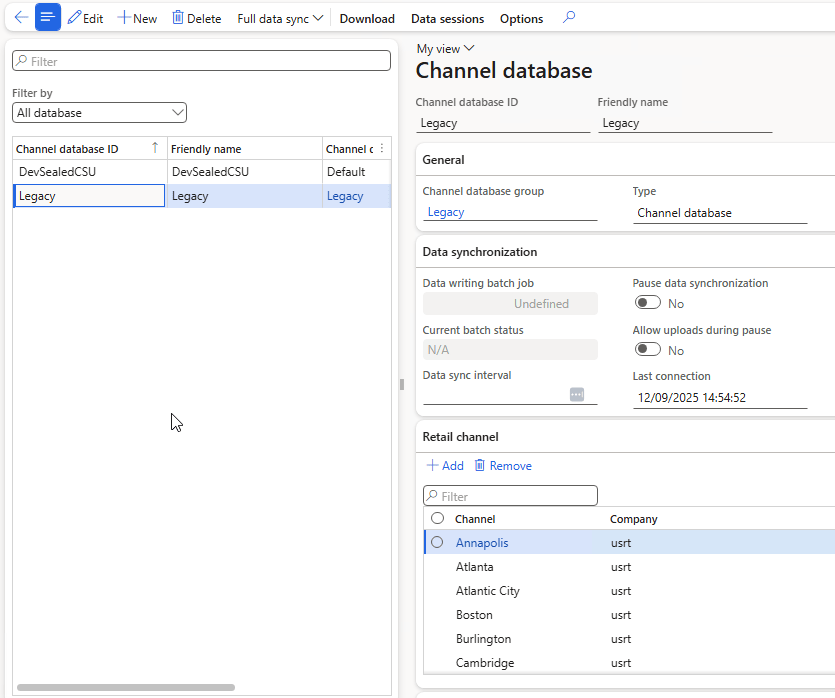
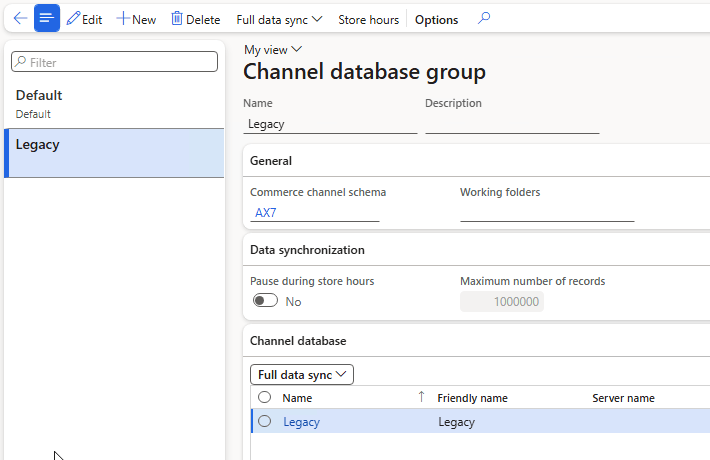
Step 2 – Add Channel database
Steps 2 and 3 result in a single Store in the Default channel database group (all stores other than Houston are in the Legacy channel database group.)

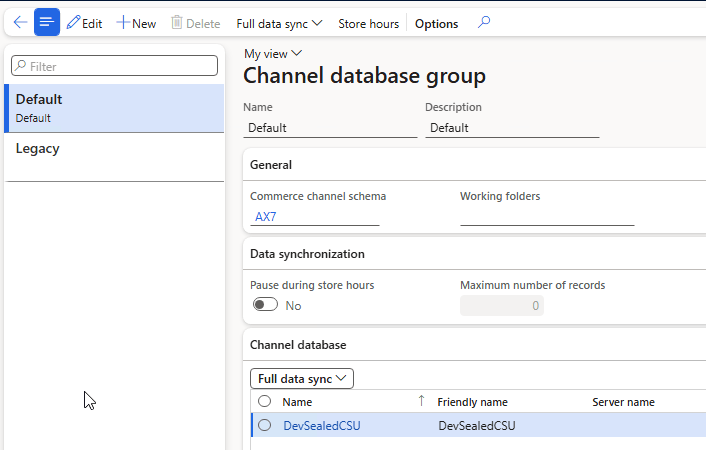
Step 3 – Create Channel database group
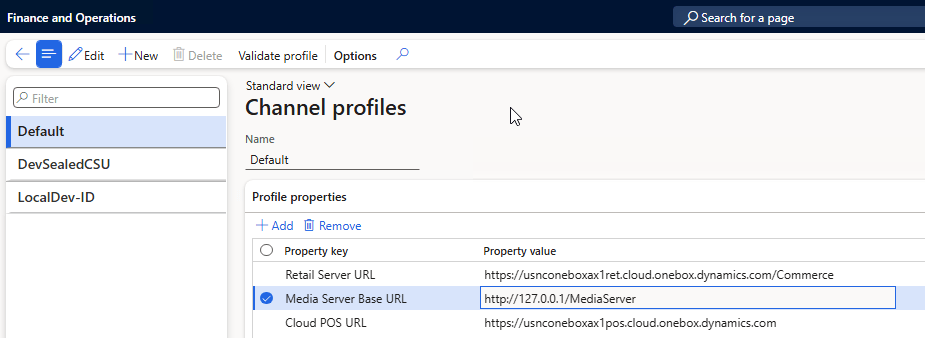
Step 4 – Populate Channel profiles
The Media Server Base URL should be the root URI of the container in the storage account used to store the images (from the Shared Access Signature – see later).
Step 5 – Update Houston store

Step 6 – Update worker
You can find the External sub identifierUPN for your account from Azure Portal Entra Id (it’s the Object ID of your account.)

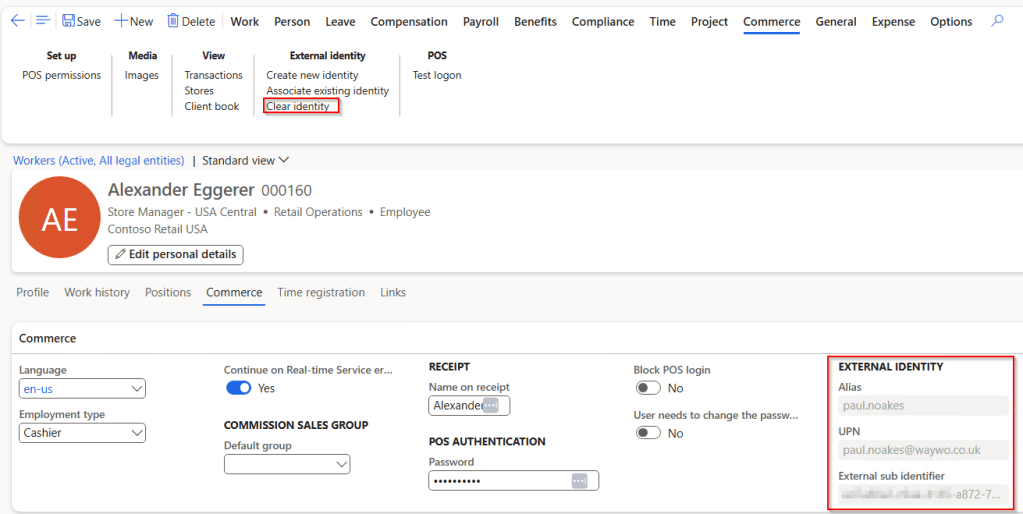
Alternatively, you can perform further configuration to make the Associate existing identity functionality work in a Onebox development environment (not recommended as it was disabled for security reasons).
Step 7 – Add Identity Provider under Commerce shared parameters
When adding the sts.windows.net issuer, you will need to include your Azure tenant Id as show below:
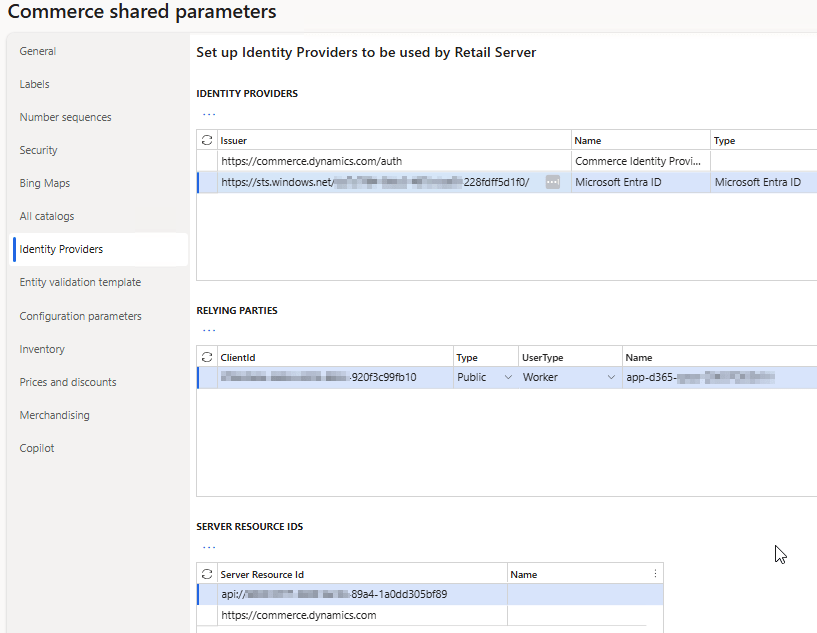
The relying party uses the Client Id of the app-d365-cpo App registration used by the POS (the Name isn’t important).
The Server Resource Id is the Resource App ID of the API permission granted against the app registration used by the CSU, and you can find this in the Azure Portal:

The configuration of this identity provider is basically saying “when a user logs into a POS using Entra Id credentials, they will be granted access to the CSU…”
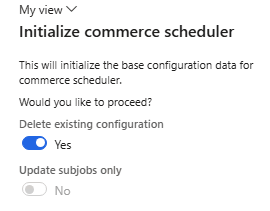
Step 7.1 – Initialize commerce scheduler [New!]
Run Initialize commerce scheduler in Retail headquarters Commerce parameters
Step 7.2 – Initialize commerce parameters [New!]
Make sure the GLRT company has a language and postal address configured and then Click Initialise in Retail parameters.
Step 8 – Run distribution schedule
Run job 9999 from distribution schedules, ensuring that the batch service is running in the VM.
Ignore Steps 9, 10 and 11 as they were completed earlier in this walkthrough.
You can see the application registrations that the script creates in the Azure Portal. Remember to delete these first if you are starting again on a new server and already ran the script on an older server version, otherwise a new certificate is generated but not uploaded to Azure as the previous one already exists.
Once the installations complete, you can check the following Urls:
- CSU HealthCheck: https://yourservername:446/RetailServer/healthcheck?testname=ping
- HS Ping: https://yourservername:450/HardwareStation/ping
Initialise the Store Point of Sale
- Start the Peripheral simulator for Commerce (You may need to run the VirtualPeripherals.msi installer manually.)

- Start the Store Commerce app and login as Alex with operator 000160 and password 123. Activate the first pending device.
- Select No drawer operation to select the hardware station (scroll all the way to the right)
Initialise the Commerce Point of Sale
Launch the Commerce POS from https://yourservername:446/RetailServer/Commerce and activate the next pending device as before. You will also need to configure the hardware station as before.
Host Product Images for POS
To display product images in the Point of Sale, you will need access to the Contoso demo images which are included in a cloud hosted development environment, but are not included with the VHD.
The simplest way to host the .png files (found under K:\RetailServer\WebRoot\MediaServer on the cloud hosted development environment) in development, is to add a new virtual folder to the Default Web Site and to enable directory browsing:

Images will be accessible from http://localhost/MediaServer and this should be reflected in the Media Server Base URL parameter in the Channel profile.
Once this is complete:
- Generate URLS from the Define media template feature in the Product images form:

- Run distribution jobs 1040, 1070 and 1150
eCommerce Development
TODO – not started!!!
Development Extension concepts
TODO – not started!!!
Trouble shooting
AADSTS500014
AADSTS500014 The service principal for resource ‘https://usnconeboxax1aos.cloud.onebox.dynamics.com‘ is disabled. This indicate that a subscription within the tenant has lapsed, or that the administrator for this tenant has disabled the application, preventing tokens from being issued for it.
Search for application 00000015-0000-0000-c000-000000000000 in Azure and enable login under properties tab.

ExtensibleEnumerationException
An exception occurred while executing request. CorrelationId: ‘1eb47620-2e4a-4760-a0f3-0cc9065338d7’. Ex: ‘Microsoft.Dynamics.Commerce.Runtime.ExtensibleEnumerationException: There is no data to initialize the extensible enumeration type. The enumeration type name: Microsoft.Dynamics.Commerce.Runtime.DataModel.ExtensibleRetailChannelType.
This is most likely due to the distribution schedule not completing successfully, or the Houston channel not appearing in the correct database group as shown above.. A reboot might help.

Interesting read Paul, thanks for this!
LikeLike
Interesting read. Thanks for this Paul!
LikeLike